Are you sure you want to do this crazy thing?
Yes No

Allow cookies?
Yes! Wait, what, maybe no? Explain please...
Welcome to the TFT Helper Adventure Creator! It's designed to make creating an adventure for TFT Helper as easy as possible. Thanks for checking it out!
You create an adventure in this web app by describing the various locations and the buttons that allow the characters to move from one to another. The adventure can also have branches where the computer sends the character to one of two locations based on various conditions you describe. Of course, you will also include some foes to fight! When you are finished you have an "Exportable", a block of scrambled text you can paste into the TFT Helper mobile app to play the adventure live. You can also share this finished adventure.
You should see eight tabs at the top of this window...
Overview - This introductory page, with buttons for various topics on the left.
Editor - This is where you actually craft your adventure.
Simulator - Walk through your adventure as it would appear on a mobile device and make sure everything works as expected! You will be able to "see under the hood" and jump to any location, streamlining the testing process.
Exportable - Presents the scrambled adventure you can load into TFT Helper and share with others.
Text Editor - Here you can write and edit your adventure as raw text. Copying and pasting this text is also the way to back up or share an adventure in development. The same content is always displayed in the Editor, Text Editor, Simulator, and Exportable tab.
Examples - Diagrams and descriptions of several sample dungeons. With a click these can be transferred to the editor so you can see how they were implemented (this will overwrite whatever is currently in the editors).
Graphic - The current adventure presented as something like a flow chart. This non-interactive diagram is not a map, but if your adventure gets tangled this may help you figure things out.
Settings and Cookies - Cookies and settings. There are not a lot, only whether you want the Adventure Creator to automatically back up your work inside the browser while you are working.
You should strive for a high level of professionalism in an adventure you plan to share. While you are not writing for SJ Games, you are writing for the customers of SJ Games and they are accustomed to quality writing. Keep it PG, no hate. The SJ Games writer's guidelines will be very helpful.
http://www.sjgames.com/general/guidelines/authors/The Adventure Creator will check for potentially offensive language. The blacklist for offensive words is borrowed from elsewhere, so no warranties are made as to its completeness. If there are words you feel should be included or excluded please let us know at tfthelper@gmail.com
In this case it means that the Adventure Creator is "feature complete" but has been tested only by a few people. Something as involved as this requires a lot of testing to be really reliable, so we need to release it to get more exposure. Because of the inherent security and app isolation of web browswers and moblie devices it is safe to use TFT Helper and New Adventures. The risk is that adventures may misbehave, or in a worst case scenario the TFT Helper app may freeze and need to be force closed. There is no known bug or potential bug that could cause the latter, but it's always a possibility. A poorly written adventure could lead the player to a dead end, but it should not affect the app's behavior otherwise. If you run into any issues let us know at tfthelper@gmail.com.
Much GMing and narrative construction advice carries over, and we don't need to go over that here. But here are some guidelines to keep in mind.
Don't make it too easy. If players complete the adventure on the first run through they are likely to feel disappointed and not revisit your adventure.
Don't make it too hard. Specifically, there will only be a single character without a lot of resources so they won't be able to face a series of fearsome foes. Put in some weaker foes. Create paths by which clever adventurers can get around some foes. Put in some encounters that offer healing (perhaps at a cost).
There should be a clear goal expressed early, perhaps even in the description. It's also fun to learn more about the goal in the first part of the adventure. Foreshadowing increases excitement.
Small screens are not the place to read novels, so you'll want short, high impact descriptions of the important elements of the adventure, and no descriptions of anything else. Your players have imaginations and they've read some fantasy, they'll fill in the rest.
You can achieve replayability by providing multiple paths to victory and degrees of success. The player should finish the game wanting to try again and achieve a better result or to try the paths not taken. Perhaps you can hint to players that characters with particular talents (eg Naturalist, Courtly Graces) will have opportunities to see other parts of the adventure and succeed via a different path.
Variables can create a lot of depth in the world, but they also create work for you. Lean towards fewer rather than many, but make them meaningful.
It is fun to learn hidden secrets. As they progress through the adventure an exciting reward is learning more about what's going on in the story, discovering that things are not as they appear.
Treasure is a classic reward, but that's because you look forward to spending it. You might devise a treasure that you can use during the adventure. Possessing a treasure can take the character to an alternate version of some locations where the character can see more or do more. If the character kills a giant rat and finds some gold the player is unlikely to remember the adventure, thre was nothing for the player to take away But if the first part of the adventure creates some curiousity about the mystery of the abandoned temple and completing the adventure means learing the secret, that will give the player something to remember.
Beware of paths that become boring or frustrating. If the player makes choices that make winning impossible, wrap things up. Write a destination that explains that they lost, or introduce an unbeatable foe. Either way they get to try again and make different choices.
It's very rewarding to players to receive goodies because their characters have particular particular Talents. These should be extras, however; an adventure that can only be won though knowledge of Courtly Graces will be frustrating if this is not made clear early on (hopefully in the description).
The Adventure Creator has been designed to make it easy for anyone to create an adventure. To that end this section, along with the sections on Using the Editor and Using the Text Editor, have been written with the important topics at the outset. You do not need to read these in their entirity, just as much as you can swallow. Reading further will introduce you to more tools to create more involved adventures, but adventures will be compelling based on design and writing, not bells and whistles. That said, bells and whistles are fun and can bring the fantasy world to life. The point is, read only as much as you want, then start creating. When you feel like it go back and read more to get more toys.
If you have played Death Test or any Choose-Your-Own-Adventure style game, you know the basic unit of solitaire adventures is the numbered paragraph. If you have not played Death Test you should probably stop and do that now, you have hours of exciting fun ahead of you and you a good grasp of the numbered-paragraph system will be very useful here, even though TFT Helper Adventure Creator doesn't use numbers, or paragraphs.
Instead, we have Nodes. A node can be a location, a trap, a foe, a test against an attriubte, a decision point in a conversation, etc. They come in three functional types: Locations, Branches, and Foes. A Location has text for the player and one or more buttons to take them further along. A Location could be a fork in the road, a response point in a conversation, a decision to drink from the magic fountain, etc. The player reads some text and taps a button. A Branch is invisible to players, the software will send the character to one of two locations according to a condition you specify, such as rolling 3d vs adjDX. A Foe is just that - something the character will fight. These nodes have names used by author and the software but the player won't see these. All three types are described in detail under Nodes.
In addition, some locations will have Actions. These are actions for the software to perform, not the character. When arriving at a Location means that something has changed - perhaps the character has taken damage or earned some XP, you will add that to the Location as an Action. The text of the Location can let the player know this has happened or not, as the author sees fit. These are described in full under Actions.
Finally, there are Variables. Variables allow the adventure to track various things during the adventure, such as how much rope has been collected, whether or not the character has picked up a key, whether or not a certain place has been visited. These are initialized at the beginning of the adventure, modified by Actions, and checked by Branches. You can also include them in location descriptions. All this is described in detail under Variables.
Nodes are the basic unit of an adventure, and they come in three types, Locations, Branches, and Foes.
Every node will have a name, which the players will not see. These are the equivelent of the paragraph numbers in a traditional solitaire adventure. When a button or branch outcome takes the player to another node the name is how it knows where to go. Node names are a string of letters and numbers with no spaces, ideally something that helps you remember what this node is.
A Location might be a physical place, but it could also be a part of a conversation with an NPC, or a report of something that has happened. One physical place in the adventure might correspond to several Locations in the adventure, since how that place is presented and what options the character has may depend on how the character got there. In these ways it is similar to a paragraph in the traditional solitair adventure.
Locations can have four parts: the name, Actions, paragraphs of text, and buttons. Actions will be discussed later, and you can postpone learning about them. The paragraphs of text are what will appear on screen when the character arrives at this Location. Buttons are also presented, but they appear as buttons and if tapped they will take the character to another node. A Location must have some text - to leave the player with nothing on the screen doesn't make sense. A Location without buttons is a dead end; this is only appropriate for the end of the adventure, since the ony thing the player can do at that point is touch the Main Menu button of the mobile app and leave the adventure. When writing adventure text you can't use @ or ^ as these have a special meaning to the software that interprets the adventure.
You can also include Conditional Buttons or paragraphs. These are optional. Conditional buttons and paragraphs will only appear if a certain condition is met. This lets you customize a Location to specific game condtions. For example: maybe characters with the Naturalist talent will see something others don't, the condition would be Naturalist > 0. You can learn more about how to write the condtions in the section on Variables.
Branches are nodes that are not presented to the player, they are executed by the software. Branches always have four elements: the name, the branch expression, the true destination, and the false destination. The branch expression is what the branch is switching on, such as a DX roll, the value of a variable, a reaction roll, etc. The true destination is the node the software will go to if the branch expression turns out to be true. The false destination is where the software will go if the branch expression turns out to be false.
Branch expressions are basically algebraic expressions, and can include variables, character attributes, die rolls.
Branch expressions can be more complicated if you want to capture more detail. For example:
You can use | or || for a logical OR, and & or && for logical AND. You can use =, ==, or === for equality. You can use parentheses. Note that if you don't use a comparison operator (=, <, >, <=, >=) an expression that works out to zero will be treated as false and any non-zero value will be treated as true. Capitalization will not matter. You can write die rolls as 3d vs ST if you like, VS translates to <=. You can use your own variables, and all the talents and attributes in the game appear automatically, so MA is MA, etc. Chartype will be 1 for heroes and 2 for wizards. Charrace is 0 for humans, 1 for elves, 2 for a dwarf, 3 if a halfling, 4 is an orc, and 5 if the character is a goblin.
The third type of node is a Foe. This is the most straightforward, even if it has the most info to enter. When the adventure leads to a Foe node combat will begin. If you want the player to be able to talk to the foe first that would be a set of Locations and Branches that might lead to compromise or could lead to actual combat, which is the Foe node.
The Foe will have a name, as all nodes do, which is how other nodes will lead to it. The player will not see this name. You will separately specify the name that will be shown in combat. You will specify all the attributes of the foe for the combat system. Range is the distance at which combat wll commence. Intro text is the text the player will see just as combat starts. Foes will also have a type, which will be one of these:
Finally, Foes will have three destinations. Win Destination is the node the character will go to next if they win the fight. Lose Destination is the node the player will see if they lose, which is probably one of the adventures endings, since there's not much the character can do when they are out of hit points. No Foe is the node the character will go to if they reach the foe but the foe is gone, either having previously been defeated or removed by other means through the Remove Foe action.
There is also a virtual node called LastLocation. When a button or branch tries to go to this location the adventure will return to the last Location the character visited.
Arriving at certain locations means something significant has happened that effects the game state, and you can make this happen with Actions: Heal, Rest, Damage, Grant XP, Remove Foe, Reassign Variable, and Writing. These things happen automatically on arriving at the Location - they are not actions the character will choose, in fact the player will not know these things have happened unless you mention it in the location description!
A Heal action comes with a number, and the character will be healed up to that many hit points. This can be a set number, a die roll such as 1d+1, or even a variable. Obviously, a character will not be healed above their initial ST.
A Rest action works the same way for Fatigue.
A Damage action is similar; the character will take the specified amount of damage. If that takes the character below 0 HP then the character has died and the player will not see this location, instead they will go to the node named after the damage amount. Note that the game assumes this is physical damage such as a fall or a trap, so armor will protect the character. If this is poison or magical damage that ignores armor you can add the armor value to the amount of damage. EG, two dice of damage that ignores armor would be expressed as "2d+armor".
Grant XP is straightforward, the character is simply granted that many XP. Characters spend XP between adventures, so there is no inherent way to use XP during the adventure. Since this is silent, like all actions, you should let the player know in the adventure text that they have earned XP, and if the character survives tell them how many XP they earned by displaying the variable XPEARNED in the final Locations by including '^XPEARNED' in the text.
The Remove Foe Action will cause a foe to disappear from the adventure. If the player reaches the named Foe location they will be diverted to the No Foe node named in that Foe's description. This is handy when the player bribes a guard or dropped a rock on the giant spider and thus won't have to fight them, or when a conversation with a potential foe turns them nuetral or even favorable, or when a foe is killed by subterfuge instead of combat. This adds depth to the adventure and increases the chances of success for a single character.
Note that actions are silent, the player won't know that they happened. It is up to you to inform them in the adventure text, or not. Of course, @Damage and @Heal may apply random amounts of damage, and you might want to mention that amount. There is a built-in variable called ^LastAction which will hold the last amount of a @Damage or @Heal action, and you can include that in your text to let the player know what happened.
Not all characters can read. If there is writing in your adventure - on a scroll, on a wall, etc, the Location description should mention the writing, but not what it says, since the character may not have the Literacy talent. A Writing Action allows you to specify what the writing says, and this will be presented as part of the description if the character has literacy. You could do this with a Branch and two versions of the Location or a conditional paragraph, but the Writing Action provides a shortcut since this may happen often. When you want to give extra info to a character with Naturalist, Architect, etc, you will need to use a conditonal paragraph or create a Branch and two versions of the Location.
The Reassign Variable action allows you to chage the value of one of the variables you set up at the start of the adventure. If the character finds some rope, wins some favor, collects some berries, consumes or spends a resource collected earlier, etc, this action makes it happen. The expression on the right side of the equal sign will be the variable's new value. This can be a numeral, die roll, variable, attribute, etc. You can read more about Varibales in their section.
Sometimes you will want to interrupt the flow of play and return to it. Perhaps there is a magic item they may choose to use in one of several locations. Perhaps time has run out and the situation has changed. You can use the Remember action to store a specific location, and then when the adventure tries to go to a location called Return (whether from a button, the result of a Branch, etc) it will go to the remembered location instead.
Variables let you store a number to keep track of various things to add richness to your adventure. You can keep track of whether or not a particular item has been picked up, how much of a resource is left, how many times something has happened, whether or not a particular event has happend, or how much silver or rope or berries the character has picked up here and there. You give a variable a name and a starting value at the top of the editor. Variables can then be modified by Actions when the character arrives at a Location.
The value of variables can affect the adventure in two ways. Most commonly, you will check the value of a variable in a Branch and go to one of two Locations (or Foes, etc). Some variables keep track of how much time or food or air is left, and it would be inconvenient to have a Branch every time the player makes a move to see if it's run out. These variables will have a Zero Destination named in the Variable box at the top of the editor. When this variable reaches zero or below the character will go straight to the Location, Branch, or Foe named in the Zero Destination field. This may or may not be end of the adventure. All the actions of the original location will happen, but the player will not see the description or buttons of that location, they will go directly to the Zero Destination. If you want to return, see the Remember/Return feature.
Variables are listed at the top of the Editor, and they always have starting value. That starting value doesn't have to be a number, it can be a forumla including Attributes, Talents, and die rolls.
You can change a variable at any Location by using an action like ^foodLeft = foodLeft - 1 That would subtract one from the variable foodLeft. You can use die rolls in the standard TFT notation, as in ^foodLeft = foodLeft -1D.
If you want to get fancy there are a few more details: + - * / ^ % all work, and you can use parentheses. If you do division you may get a decimal result, so ^numberOfWebs = numberofWebs / 2 when numberOfWebs starts at 5 will give you 2.5. If you want an integer subtract the decimal part using the % 1 trick, eg assuming torches = 5 then ^torches = torches / 2 will set torches equal to 2.5, but ^torches = torches / 2 - torches / 2 % 1 will set torches equal to 2. If you want to get really fancy the ternary operator will work.
Perhaps there is a key that opens a particular door. At the top of the editor you would add a variable called silverkey and set it to 0. The Location where the key can be picked up would have an Action that sets silverkey to 1. If the character arrives at the door it will not be a Location but a Branch. The Branch will check if the value of silverkey is greater than 0. If it's not they do not have the key and the Branch will lead to the location where they are faced with a door they cannot unlock. You can present them with the option to try to break it down or go back or whatever. If the value of silverkey is greather than 0 the Branch would take the player to a location where they have the option of unlocking the door.
You can include the value of a variable in your adventure text or button text by putting a caret (^) in front of the variable name. So the value of a variable called FOODLEFT will be substituted into "You have ^FOODLEFT days of food left."
There are many "automatic" variables that let you use the basic game elements in assigning variables and testing conditions in branches. ST, DX, adjDX, IQ, MA, armor, injury, fatigue, xpearned are the most obvious. Chartype is 1 for heroes, 2 for wizards. Charrace is 0 for humans, 1 for elves, 2 for dwarves, 3 for halflings, 4 for orc characters, and 5 if the character is a goblin. In addition, each Talent and Spell is a variable, set to 0 if the character does not have that Talent or Spell and 1 if they do.
Examples: 3d < ST - armor + 2 * swimming this is a swimming roll, three dice vs ST penalized by the weight of your armor with a +2 if you have the Swimming talent.
In general you will not change these automatic variables, but this game does have "Fantasy" right in the name so you definitely can. You can change any Talent or Spell to 1 to give a character that Talent or Spell, or set it to Zero to take it away. You can increase ST or DX if the player drinks from a magical fountain or whatnot, and you can lower a chracter's stats if you really want to annoy them.
The value of the last action such as @heal or @damage is stored in a variable ^lastaction that you can use in your adventure text to report what happened. This is stored until the next @heal or @damage in case you want to use it in a branch or store it in a variable.
Some variables keep track of how much time or food or air is left, and it would be inconvenient to have a Branch every time the player makes a move to see if it's run out. For situations like this you can set a Zero Destination when assigning or reassigning a variable's value. When this variable reaches zero or below the character will go straight to the Location, Branch, or Foe named in the Zero Destination field. This may or may not be end of the adventure. All the actions of the original location will happen, but the player will not see the description or buttons of that location, they will go directly to the Zero Destination. If you want to return, see the LastLocation node or Remember/Return feature. Once a Zero Destination has been triggered it will clear, the character will not be brought back to that location over and over, even if the variable in question is raised and then lowered back to zero again. You can set the Zero Destination again if you want, but if you don't it won't be there.
An interesting adventure involves a lot of details and contingencies, and working with all this is challenging. The Visual Editor allows you to work with all this info in a handy way. You should read the tour below, and the sections on Nodes, Locations, Branches, and Foes. Then you can start creating. When you get the hang of it you can learn about Actions and Variables.
At the top of the editor you will enter the basic info about your adventure: the Title, Creator (you!), and the maximum character attribute level the adventure is suited for. Typical TFT characters start with 32 attribute points, and this system should work well up to 36. You can read more about Test Mode under Editor Features. You also enter a description that will be visible to people before they load the adventure, up to 50 characters.
After the basic info you can initialize Variables for the adventure. You can ignore variables, or read more about them in their own section.
After the variables come the nodes, each in their own box. Every node has a unique name in the upper left corner, followed by the other elements necessary for that type of node. In the lower right corner of each node's box is a button to delete that node.
Below the scrolling list of nodes boxes is a row of buttons that will let you add new nodes of each type. You can read more about First/Later Locations below, but in a nutshell this button quickly creates several nodes such that a location will appear one way when a character first visits it and differently when they return. There's also an Undelete button that will show you a list of deleted nodes if you want to pick one to bring back from the dead. (The graveyard of deleted nodes is not preserved between sessions.) The Create Missing Nodes button will create Locations for all the names that your buttons and branches try to visit which you have not created yet. This can be handy as you are first sketching out your adventure, but of course if some of those buttons should lead to branches instead of locations you'll want to create those first manually.
Below these buttons is the Report window. This lists all the problems with your adventure at the moment - buttons that go nowhere, locations to which nothing leads, and so on. Each item will have a link with the name of the node with each problem that will scroll the editor straight to that node. If a node links to a node that does not exist yet there will be three buttons allowing you to create a Location, Branch, or Foe with that name.
On the right hand side is a list of all the nodes you have created so far. You can click on any of these to scroll the editor to show you that node so you can work on it. This starts out in chronological order, that is the order that you created the nodes, but below the list are buttons to swtich this to alphabetical order if that's easier.
Finally, in the lower right hand corner are buttons that will let you save the current adventure to a file, or load an adventure from a file. Saved files will likey appear in your Downloads folder. These are ordinary text files and you can edit them in another application if that is helpful. You can save them again as text and load them with these buttons or copy the work and paste it into the Text Editor.
If you have played Death Test or any Choose-Your-Own-Adventure style, you know the basic unit of solitaire adventures is the numbered paragraph. If you have not played Death Test you should probably stop and do that now, you have hours of exciting fun ahead of you and you a good grasp of the numbered-paragraph system will be very useful here, even though TFT Helper Adventure Creator doesn't use numbers, or paragraphs.
Instead, we have nodes. A node can be a location, a trap, a foe, a test against an attribute, a decision point in a conversation, etc. They come in three types: Locations, Branches, and Foes. A Location has text for the player and one or more buttons to take them further along. A Branch is invisible to players, the software will send the character to one of two locations according to a test you specify, such as rolling 3d vs adjDX. A Foe is just that - something the character will fight. These nodes have names used by author and the software but the player won't see these.
In addition, some locations will have Actions. You can ignore actions for now, or read more about them below. These are actions for the software to perform, not the character. When arriving at a Location means that something has changed - perhaps the character has taken damage or earned some XP, you will add that to the Location as an Action. The text of the Location can let the player know this has happend or not, as the author sees fit.
Finally, there are Variables. You and start working without these and add them to your toolbox when you like. Variables allow the adventure to track various things during the adventure, such as how much rope has been collected, whether or not the character has picked up a key, whether or not a certain place has been visited. These are initialized at the beginning of the adventure, modified by Actions, and checked by Branches.
Most locations will be physical locations. They start with a description of the location, then present one or more buttons. The button labels should be short, so the description of the adventure is the place to put more information about where the buttons go. It is possible to put text between buttons. You can start a new line by including a Return in the text, and start a new paragraph with two Returns. You'll be able to see how everything looks in the Simulator.
A location without any buttons is possible, this is a dead end. This may be appropriate for the end of the adventure, and the user can exit by using the Main Menu Button. A good adventure will make it clear that this is the end and remind the user to go to the main menu.
Some locations should be different when the character returns to them after the first visit. A trap will already have been triggered or disabled, an item will already have been collected, etc. This is easily done with a variable that keeps track of whether or not the location has been visited and a branch to send the player to either the unvisited or visited version of the location. Since this is an important way to make adventures great there is a short cut to setting this up: the First/Later Location, explained below.
A Branch is invisible to players as the character is sent to one of two locations depending on circumstances. When you add a Branch you will give it a name, which other parts of the adventure will use to get here.
Then comes the heart of the Branch, where you specify what gets compared to what to decide where the adventure goes next. Can the character climb out of the pit? It's a 3d roll vs adjDX. You would put 3d for the first term, <= for the middle term, and adjDX for the third term. Does the character have the Naturalist talent? You would put Naturalist for the first term, > for the second, and 0 for the third. Is the charcter wearing metal armor? You would put armor for the first term, > for the second, and 2 for the third, since armor with a value of 1 or 2 is non-ferrous.
Following the condition you will specify the name of the node to vist next if the condition is true and the name of the node to visit next if the condition is false.
Things you can use in the comparison terms include character attributes and talents, variables you create.
Examples:
1d > 5 (a basic reaction roll)
4d < = adjDX (a difficult climb)
ST > 12 (can the character lift that stone?)
Naturalist > 0 (does the character have a particular talent?)
charRace (0=human, 1=elf, 2=dwarf, 3=halfling, 4=orc, 5=goblin)
armor > 2 (is the character wearing metal armor?)
Be sure and use adjDX instead of DX when armor would affect the outcome. Also, be sure and use <= or > and never => or =<, as the latter won't work.
If you want to get really fancy the condition for the branch can include "and" and "or" in the form or && and ||. Be sure to test carefully with the Simulator to make sure you are writing what you think you're writing. You can use parentheses to group things.
literacy || courtlygraces - will go to @destinationTrue if the character has either Literacy or Courtly Graces.
alertness && armor < 4 - will go to @destinationTrue if the character has Alertness and they are wearing chainmail or lighter.
charRace = 1 && injury = 0 - will go to @destinationTrue if the character is an uninjured elf.
Talents like Alertness, Acrobatics, and so on should give bonuses to some rolls. This is easily written since the various Talents act like variables. So...
3d <= adjDX + ( Acrobatics * 3 ) - a 3d roll vs adjusted DX with a bonus of 3 if you have Acrobatics
4d <= IQ + ( Alertness * 2 ) - a 4d roll vs IQ with a bonus of 2 if you have Alertness
The value of the Talent is one if the character has it, zero if they do not. Multiply that but the amount of the bonus and add it to the number you're trying to roll under. This works the other way around, of course...
3d <= st - armor - a swimming roll with armor as a penalty.
If you really want to get fancy you can google ternary operator and give an Elf a penalty to an IQ roll in the presence of an insect like this:
3d <= iq - ( charace == 2 ? 3 : 0 )
Of course, if you want to give characters with Naturalist a bonus in the same situation you would write:
3d <= iq - ( charrace == 2 ? 3 : 0 ) + ( naturalist * 2 )
...of course, the player will never see any of this.
When the adventure reaches a Foe there will be a fight. If you want a chance to avoid the creature or a conversation before the fight breaks out, those should be separate locations that might lead to the Foe, but once you get to the Foe the fight starts. The combat intro text is presented and initiative is rolled.
The Foe has a name like other nodes, then you will enter the various attributes of the Foe. These are mostly self-explanatory except for Type. This tells the software how the Foe should behave in a fight - charging straight in, keeping distance, and so forth. Spoiler: there are only four Wizards possible, specified here.
Finally you will specify the nodes to visit next if the character wins or loses, the latter being one of the adventure's endpoints. If the character returns to this Foe after having defeated it, or if the Foe is removed by some other means than a fight via the Remove Foe action, the player will be taken to the node named undr No Foe.
Variables let you store a number to give you a chance to keep track of various things to add richness to your adventure. You can keep track of whether or not a particular item has been picked up, how much of a resource is left, how many times something has happened, whether or not a particular event has happend, or how much silver or rope or berries the character has picked up here and there. You give a variable a name and a starting value at the top of the editor. Variables can then be modified by Actions when the character arrives at a Location.
The value of variables can affect the adventure in two ways. Most commonly, you will check the value of a variable in a Branch and go to one of two Locations (or Foes, etc).
Variables are listed at the top of the Editor, and they always have starting value. That starting value doesn't have to be a number, it can be a forumla including Attributes, Talents, and die rolls.
You can change a variable at any Location by using an action like ^foodLeft = foodLeft - 1 That would subtract one from the variable foodLeft. You can use die rolls in the standard TFT notation, as in ^foodLeft = foodLeft -1D.
If you want to get fancy there are a few more details: + - * / ^ % all work, but you cannot use parentheses; if you have a complex formula you will have to split it onto to successive lines. If you do division you may get a decimal result, so ^numberOfWebs = numberofWebs / 2 when numberOfWebs starts at 5 will give you 2.5. If you want an integer subtract the decimal part using the % 1 trick, eg assuming torches = 5 then ^torches = torches / 2 will set torches equal to 2.5, but ^torches = torches / 2 - torches / 2 % 1 will set torches equal to 2. An exclamation point will give you the logical opposite of something, so !Swimming is TRUE if the character does NOT have swimming. If you want to get really fancy the ternary operator will work.
Perhaps there is a key that opens a particular door. At the top of the editor you would add a variable called silverkey and set it to 0. The Location where the key can be picked up would have an Action that sets silverkey to 1. If the character arrives at the door it will not be a Location but a Branch. The Branch will check if the value of silverkey is greater than 0. If it's not they do not have the key and the Branch will lead to the location where they are faced with a door they cannot unlock. You can present them with the option to try to break it down or go back or whatever. If the value of silverkey is greather than 0 the Branch would take the player to a location where they have the option of unlocking the door.
You can include the value of a variable in your adventure text or button text by putting a caret (^) in front of the variable name. So the value of a variable called FOODLEFT will be substituted into "You have ^FOODLEFT days of food left."
Sometimes when a character arives at a Location that location will change: a trap will be sprung, items will be collected, a conversation will take place, etc. This means that the place will be diferent when the character returns to this point on the map. This is easily done: you create a variable called "placeVisited" and set it's value to 0. The node named "place" will be a Branch, not a location. The condition for the Branch "place" will check if the variable placeVisited is equal to zero, and if it is send the player to a Location called "placeFirst". If the value of placeVisited is not equal to zero the player will go to a Location called "placeLater". The Location placefirst will include an Action that will reassign the variable placevisited to 1 (or any other non zero number).
This is not hard at all, but it's a lot of steps for something that happens pretty often, so there's a button that will do it all: Add First/Later Location. This button will ask you for the place name, then create the Variable, Branch, both Locations, and the Reassign Variable Action to make it all work. All you need to add are the descriptions of the two locations and any Actions or Buttons needed.
The Editor continually saves your work inside the browser if you have "LocalStorage" enabled in Settings, so if you close the window and come back later you should find your work as you left it. The adventure is stored in something called LocalStorage, which is not the same as "Cookies" but will be cleared at the same time. So if you are going to clear your cookies you should save your work before doing so.
To save your work outside the browser go the to Text Editor tab where you will see all your nodes in pure text format. You can copy all this text and then paste it into a text document on your device to save it. Later you can paste all this back into the Text Editor to restore all your work.
Test Mode will be set to 0 for the adventure you will share with others. While you are writing the adventure you can set Test Mode ON and load the adventure into TFT Helper to test it with a couple of advantages. Your character will start with 23 hit points, so they won't die too easily. That means you will survive the combats, the traps, the falls, but it's not too many that you can't test character death. Additionally, you will see two buttons on the character sheet in TFT Helper, a staff of Aesculapius and a skull. The staff of Aesculapius resets injury and fatigue to 0, and the skull sets injury to 23. The latter won't kill the character immediately, but the next time character hit points are checked the character will be considered dead.
The Undelete button will show you a list of the nodes you have deleted. You can select one and restore it to the same position in your adventure. Note that this is not stored in LocalStorage so it is volatile - if you refresh your window, close the window and return later, etc, the Undelete window will be empty. This window also only stores whole nodes; if you delete a Button, Action, Variable, etc, it will not be recoverable.
The Create Missing Nodes button will first look for any Remove Foe actions that have no corresponding foe and create corresponding foes, along with locations for their missing, defeated, and victorious nodes. Then it will create locations for any buttons or branches that don't exist. You still have to describe them, but this will save you some clicking.
Clear All Nodes will erase your entire adventure. You will get a confirmation box. This cannot be undone. If you want to save your adventure outside the web app before erasing it you can copy the entire contents of the Text Editor and save it in a text file as above.
Below the node list and the buttons is a report on any problems with the adventure: buttons that go nowhere, etc. You will need to fix these issues before proceding to the Simulator or Exportable tabs. Luckly the report will include links that will scroll straight to the nodes with the issue.
There are a few things the Visual Editor won't do, and if you need to do these you will need to use the Text Editor.
You can't change the order of nodes. The order of the nodes doesn't matter to the software, but if the order you originally created your nodes is getting in the way of improving and revising them and you want to reorder them, you'll need to do that in the Text Editor with Cut-and-Paste. Be sure to save your work first. Be sure to cut and paste entire nodes.
You can't duplicate things - whether entire nodes, buttons, etc. If you have several locations that are largely similar it might be more efficient to write on, make copies, and then edit each copy. You will have to do that in the Text Editor.
You can't change a node's type, changing a Branch to a Location. These are so different there's no obvious way to convert them, so just delete the node and create a new node of the desired type with the same name.
You can't spell check or do a global search and replace. If you wanted to change "amulet" to "talisman" throughout your adventure you would need to go to the Text Editor, copy the entire adventure, paste it into an editor that will let you search and replace, do that, copy it, and paste it back into the Text Editor. Not hard, but not easy. The same goes for other advanced editing tricks.
Clicking on the Simulator tab takes you to the simulator, which will let you see the adventure as your players will see it on a simulated phone screen. This allows you to step through and make sure things are connected the way you intended, and nothing is left out.
The center of the window will be the simulated phone screen. The text and buttons will appear exactly like they would for player running the adventure on the TFT Helper mobile app. Note that if there are problems with the adventure (buttons that go nowhere, etc) you will have to resolve those before the simulator will work.
When you reach a branch the simulator will follow the appropriate branch for the character and conditions, EG if a character with the Naturalist talent should go to one version of a location where they get more information and options that a character without that talent, then that's what the simulator will show. In cases where the branch comparison invovles a die roll a dialog box will ask you which path you want to pursue so you can conveniently test each one.
Similalry, when you face a foe you will see a dialog box showing the foe's combat opening description and stats, and then you can choose to follow the path where the character wins the fight or the path where the character loses the fight.
In the upper right hand corner you will see buttons that allow you to restart the adventure with a typical armored fighter or a literate wizard. The third button lets you load in a custom character from the text area immediately below that button, so you can simulate the adventure with that character. The Adventure Creator will expect you to use this format:
Jon of the Isles human, age 23 ST 12, DX 12, IQ 8, MA 10 Talents: Sword, Shield,acrobatics,naturalist,literacy Spells: Blur Weapons: Broadsword (2d), Small Shield (-1 hit) Attacks and Damage: Punch 1d-2 Armor: leather Equipment: Special Note:
You can edit the character in that little space, if that works. The imported character will be remembered between sessions if you have localStorage turned on.
Below this is a a list of all the nodes in your adventure - locations, branches, and foes. You can click on any node to go directly there. This will save time testing larger adventures, since you won't have to walk through the whole adventure to get to the part you want to test. If you click on a branch it will immediately resolve as if you had travelled there, offering you a dialog box if a die roll is involved. If you click on a location with actions those actions will happen immediately, but of course any actions that would have happened if you had stepped through each location to reached the clicked location will not have happen.
In the lower right hand corner is a history of the nodes visted so far in this run through. Clicking here does nothing.
In the upper right hand corner is a list of the variables in your adventure with their current values, updated as you go through the adventure. You can click on any of them to change them.
Below this are the character attributes as they exist at the moment. You can click on these to change them, too.
Below this are lists of the Talents and Spells, which are like variables that are set to 1 if the character has that Talent or Spell and 0 if they don't. You can click on these to change them. There are checkboxes to list only the abilities the character has, ie only the non-zero values.
Testing with the simulator is an efficient way to check your work as you write your adventure, but it's not a substitute for testing your adventure on the mobile app before sharing it with other people.
Clicking on other phone features may reveal other features.
The Exportable is the block of text you will share with the world. It's been prepared for the TFT Helper mobile app to present, and it's been scrambled to prevent spoilers. The text in that textArea is the adventure that can be played on the mobile app. Copy it to the clipboard or save it to a file and share it with your friends in any way you can move text.
Once you have the text on the clipboard of a mobile device you can launch TFT Helper, then select Go On An Adventure from the main menu. Select a character and then select New Adventures from the adventure menu. In the bottom part of the New Adventures scren is a text area you can paste the exportable into, then tap Import to see that adventure added to the menu of adventures above. Now you can play it for real.
Someone is going to ask why we're using a bespoke format instead of JSON or XML. Those formats use a lot of punctuation and extra tags in those formats and they are hard for humans to parse. But if you want to use JSON you can copy the JSON in the textArea below and take it to another editor to edit. When you're done you can bring the result back here, paste it into the JSON window, and click Import JSON to bring it back into the Adventure Creator.
If you want to edit your adventure in XML there are many JSON-XML convertors on the web.
Note that these adventures are scrambled and not encrypted. I don't need the headaches that come along with a mobile app associated with "encryption".
The Text Editor lets you manipulate your adventure as straight up, plain vanilla text. Some people will find this more straightforward, while other will find it arcane, which is why the Adventure Creator gives you a choice. Text is handy if you want to email an excerpt to a collaborator, rearrange the sequence of the nodes you have created, do a gobal search-and-replace on some name, and other tasks. Every change you make in the adventure creator is within a few seconds evaluated and copied so that the Visual Editor and Text Editor as well as the Simulator all show the same thing, and the error report at the bottom of the screen is always up to date.
Under the Text Editor tab you will see a big text area where you can edit your adventure. Line numbers are managed by the Adventure Creator to help you locate the problems mentioned in the report, which appears below the text area. On the right side you will see buttons that will let you clear the editor, save the contents, or load contents from a text file. Below this two buttons will allow you to see either a reference to the text formats described below for adventure elements or a list of existing locations you can click on to scroll the editor to that location.
At the top you will have five lines...
@title Temple of the Toad God @creator Jane the GM @description Not much of a temple, really. @maxattributes 32 @testmode
"@title" precedes the title, of course, and the same with the creator name and short description. @maxattributes specifies the maximum character attributes for this adventure. 32 is the normal starting attribute total, but you can design adventures that allow higher totals. Be aware that only the most basic Talents and Spells are implemented, and higher level characters generally use those. @testmode is activates test mode for the adventure in the mobile app; see using the Simulator for detils.
After this header you can initialize variables. They must be initialized before the first location. The caret ^ is used to introduce them. They must have a starting value. If you want an optional Zero Destintion for a variable it will be the last word on the line. The initial value can be a formula.
^ropeCollected = 0 ^daysOfFoodLeft = 10 starving ^carryingCapacity = ST - armor
After the variables you will enter your locations, nodes, and branches. A location will start with @location followed by the nodes name. After this comes the text describing the situation. Buttons follow: @button is followed by the name of the destination, the name of the node this button will take you to. The next line is the text that will appear in the button, don't make it too long. If it makes things clearer you can intermix text and buttons. Here is a simple location:
@location caveEntrance The cave entrance is at least twelve feet high. Cool, damp air exudes from it. To the south is the path that leads back to the farmstead. @button firstChamber Enter the Cave @button pathToCave Follow The Path
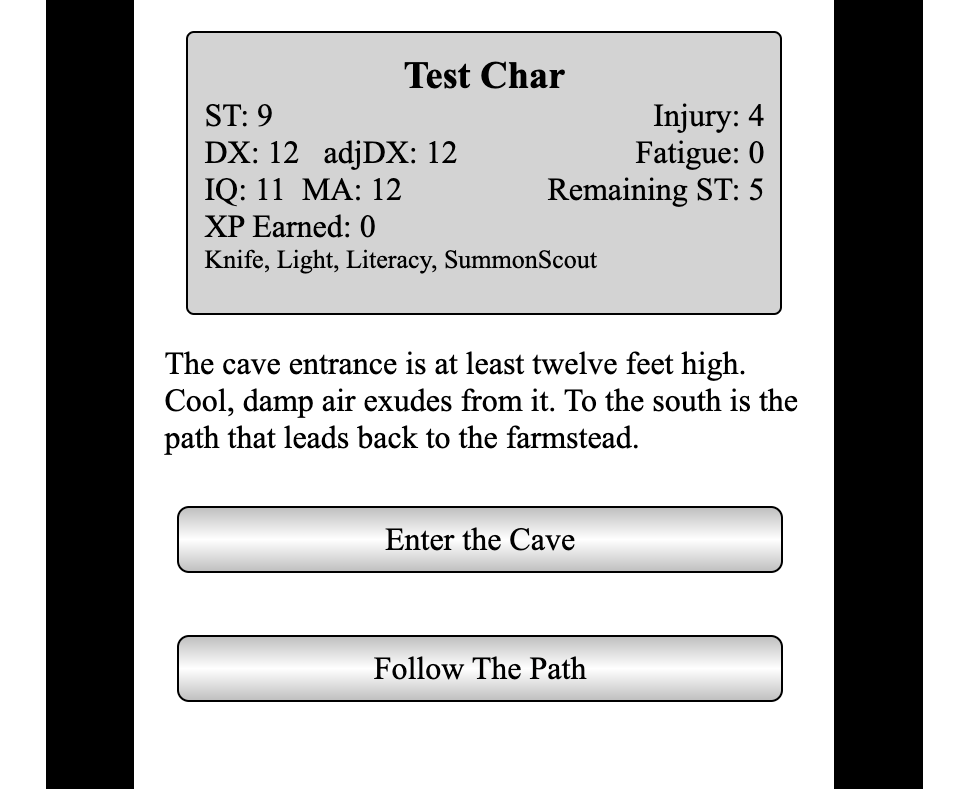
If you want to include a Conditional paragraph or button, simply precede it with a line that starts with @if followed by the expression that will determine if that paragraph or button appears. Here's an example:
@location alongthepath Along the path there are some bushes. @if Naturalist You notice some healing herbs among them. @button pond Continue to the Pond @if naturalist @button pickherbs Pause to Pick Herbs
In this case a typical character would only see the bushes and the Continue button. A character with naturalist would also learn more about the bushes and have the button appear that will allow them to pick some.
If there are any Actions include them under the @location line. For example here is a location resulting from failing a climbing roll. When the character arrives here they will take two dice of damage (armor protecting) and if they die from that they will go straight to a node called 'deathbyfall'. If they survive they will get 5 XP but lose whatever rope they had. Note that the result of the damage will be substituted in the text for ^lastaction.
@location fallen @damage 2d deathbyfall @xp 5 ^rope = 0 Your grip fails and you fall, taking ^lastaction points of damage. You do feel somewhat wiser for the experience, but you have lost your rope.
Branches are easier, they always have four lines. @branch is followed by the node name, and the next line will be the condition. After this @destinationTrue is followed by the name of the node to go to if the condition evaluates to true, and @destinationFalse is followed by the name of the node to go to if the expression works out to be false.
@branch climbDown
3d
In this simple example three dice are rolled against adjusted DX, and if the character succeeds they will go to the node called climbdownsuccess. If the roll fails they will end up at fallen. The section on Using The Editor goes into detail about the conditional expressions. They can be very simple, as here, but if you want to have involved situations they support a lot of complexity.
If you want to choose between more than two outcomes you need to link branches. Here's an example where a character might have no rope, 1-29 feet of rope, or enough rope for a 30 foot climb, and will end up at one of three different destinations as a result.
@branch inside
^ropeCarried>0
@destinationTrue insideSomeRope
@destinationFalse insideNoRope
@branch insideSomeRope
^ropeCarried > 29
@destinationTrue insideEnoughRope
@destinationFalse insidenotEnoughRope
Foes have many lines to fill out, but they are always the same.
@foe foeName
Combat intro text
@type 0
Scruffy Swordsman
Human, age
ST 12, DX 14, IQ 8, MA 10
Talents: Sword
Spells:
Weapons: Broadsword (2d), Main-Gauche (1d-1)
Attacks and Damage: Punch 1d-3
Armor:
Equipment:
Special Note:
@range
@xp
@winDestination searchSwordsmansBody
@loseDestination diedAtGate
@noFoe emptyGateway
Following @foe is the node's name, of course. Then comes the text that will be displayed at the start of combat. @type tells the software how this foe should behave in combat, and the types are listed below. Then the name that will be used in combat occurs, followed by the other stats in standard TFT format. @range specifies how far apart the foe will be at the start of combat. @xp is how many xp will be aerned if the foe is defeated. @winDestination is the node the player will see next if they win the combat. @loseDestination is where they will end up if they lose (probably the end of the adventure, though you could provide healing at that location and say they were only captured). @nofoe is the node the character will be taken to if the foe is not present, having been defeated earlier or removed by a @removeFoe action.
Here are the foe types:
Don't use the at-sign '@' or caret '^' in the text of your adventure, in location or branch names, or in button text. < and > can be use in branches as part of the conditional expression (eg "IQ > 10") but can't appear in location descriptions. You can use all the other special characters on the keyboard, but you cannot use spaces in the names of Locations, Branches, Foes, or in the names of variables.
Captialization will never be important to this software. "@Title", "@title", "@TITLE", and "@tItLe" are equivelent, and the location names "caveEntrance", "CaveEntrance", and "caveentrance" will all be the same place. Fair warning, nearly all modern programming languages care very much about capitalization, so avoid building bad habits. The names of Locations and variables must be a continuous string of numbers and letters - no spaces, no special characters.
Unicode is not supported, if you are wondering. It will probably work in description text and buttons, though it is likely to be very distracting. "Probably" means "that's why we test things." It will certainly cause unpredictable behavior in Location or Variable names.
-1 = creature, charges and melees, dropped/broken weapon means they take damage
0 = melee fighter, charges and melees, drops or breaks weapons as normal
1 = melee fighter with pole weapon
2 = archer, shoots immediately, then switches to their melee weapon and charges
3 = mage that casts Dazzle, then Magic Fist, has Staff
4 = mage that casts Illusions of bears
5 = mage that casts Sleep
6 = mage that casts Fireball
A sketched out map is a great way to start working out your ideas for your adventure. Unfortunately, such an intuitive representation fails when some locations correspond to several nodes in the adventure, which happens when a place appears differently and offers the player different choices based on their abilities, how they got there, what they have done so far, etc. On top of that, the journey between map locaitons may involve decisions and tests, which may lead the character somewhere other than where they meant to go when they left the last location.
This representation, then, is not a map but a display of your nodes and how they connect to each other. The green rectangles are locations, the ivory rectangles are the names of the buttons that lead from one location to another. The purple diamonds are branches. The orange circles are foes. These are the same colors as the boxes in the editor.
While an entire adventure would be hard to follow if you lose track of the buttons and conditions leading through one part of your adventure you can look for that section in this image and hopefully figure out what's wrong.
When you are studying the example adventures the graphic can also be a good way to get a handle on how they fit together.
 illuminati
 99:99
99:99
 110%
110%


This should not show up.
This should not show up.
This should not show up.
Here is your adventure, prepared to paste into TFT Helper and scrambled to prevent spoilers. Be sure and copy the entire contents of this text field, including all the "<><>..." lines.
These sample adventures are short, but demonstrate how to set up particular situations. Loading any of these will overwrite the adventure currently in progress.
          graph TD
          A[Client] --> B[Load Balancer]
          B --> C[Server1]
          B --> D[Server2]
The TFT Helper Adventure Creator does not use cookies. It does use a feature of HTML 5 called localStorage to retain the adventure you are working on between sessions. The difference between Cookies and localStorage is that a web server leaves cookies on your computer and then requests your browser to send the cookie back to the server later. This allows the server to keep track of who you are and what you have been up to, giving a better user experience at the cost of some degree of privacy. In contrast, as you use TFT Helper your browser will store your work on your computer and it will not be sent anywhere by the web app. Unless and until you purposefully copy the Exportable and share it with the world, no one else has access to it. Thus there is no privacy issue associated with the TFT Helper Adventure Creator's use of localStorage.
Unfortunately, much of the legislation in various places around the world does not distinguish between cookies and localStorage. It's impossible for the small developer to keep track of laws and regulations in various jurisdictions, so we just have to avoid any possible trouble. Thus if you disable localStorage your work on your adventure will not be saved between sessions; you will need to save your adventure to disk (always a good idea) or copy the text of your project and paste it somewhere it will be saved.
localStorage is currently enabled.
Use localStorage for my convenience! Disable localStorage
Thanks for trying out Exciting Web App. Have fun!
What you're about to do will overwrite the contents of the field in this browswer window with your text in it, and Undo will not fix it. Are you sure you want to proceed?
Yes, Overwrite No, Wait, Cancel, StopYou should periodically save the text you are working on to a file on your computer or somewhere in the cloud.
For your convenince the TFT Helper Adventure Creator will try to save your work in your browser whenever you press the button with that name, whenever you switch tabs, and when you leave the page. Different browswers handle this differently, however, and the storage used is the kind the browser may clear if space is tight. Therefore you should save your work to your Downloads folder with the button, or copy your text and paste it somewhere else convenient as you like.
When you set Test Mode On in the Editor or add the line "@testmode" in the Text Editor, the exportable created tells the TFT Helper mobile app that you are testing. This means your character will start with 23 hit points, and buttons will appear while playing the adventure that will let you heal and decrease hit points. While very useful for testing, you want to be sure and remove this line before you share this adventure with anyone but collaborators.
A @branch can compare:
an integer, eg 12, 100
a character attribute: ST, DX, IQ, adjDX, MA, Armor
a modified attribute, eg DX-2
a character Talent (they don't have it = 0, if they do = 1)
character Race or Type, eg "Wizard > 1"
a die roll, eg 1d, 2d+2
Comparisons can be:
vs (equivelent to <=)
<=
>
>=
= (you can also use == or === if you have those good habits)
Bonuses can also be applied for talents. The bonus value given will be added to the second value in the comparison. The bonus can be negative. Examples: